Coronal approach (including craniotomy)
1. Principles
General consideration
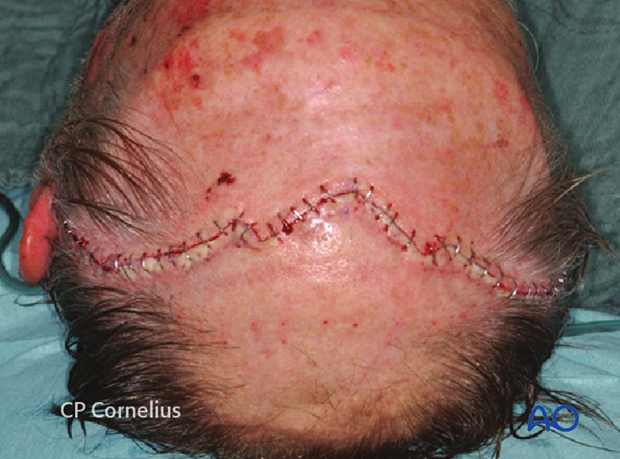
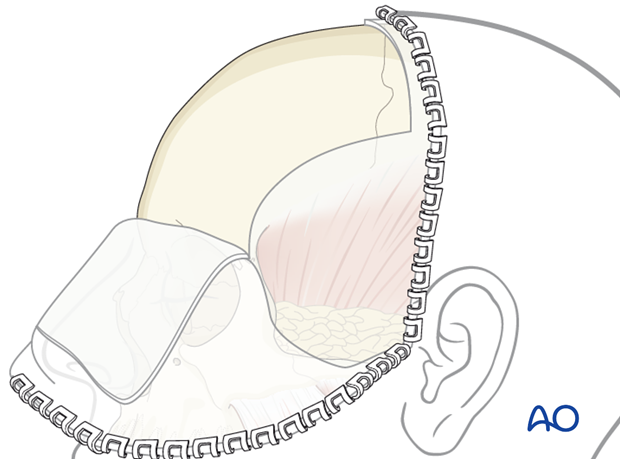
The coronal or bi-temporal approach is used to expose the anterior cranial vault, the forehead, and the upper and middle regions of the facial skeleton. The extent and position of the incision, as well as the layer of dissection, depends on the particular surgical procedure and the anatomic area of interest. The coronal approach is placed remotely in order to avoid visible facial scars.
The subperiosteal or subgaleal planes are commonly used for coronal flap dissection. While elevating the coronal flap, it is important to maintain the integrity of the pericranial flap whenever possible. The scalp incision is extended lateroinferiorly into the preauricular region to gain access to the zygomatic arch and/or temporomandibular joint (TMJ). It is important to maintain the integrity of the pericranial flap when possible. The flap can be used for obliteration of the sinus or more importantly for repair of the dural defects with posterior table fractures.
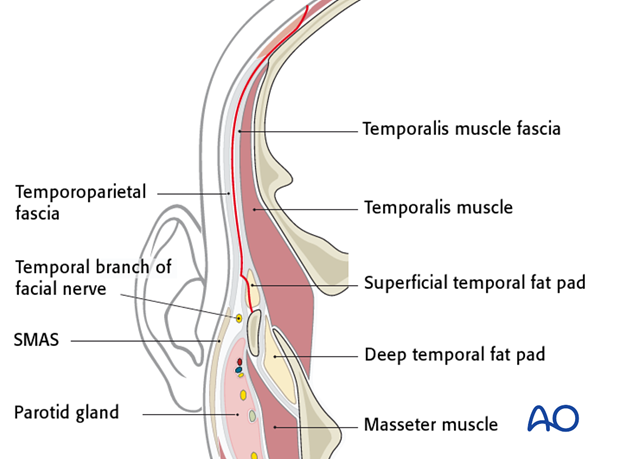
To protect the temporal branch of the facial nerve when the zygoma and the zygomatic arch are accessed, the superficial layer of the temporalis fascia is divided along an oblique line from the level of the tragus to the supraorbital ridge to enter the temporal fat pad. The dissection below this fascial splitting line is carried out just inside the fat pad deep to the superficial layer of temporalis fascia until the zygomatic arch and zygoma are subperiosteally exposed.
Access areas
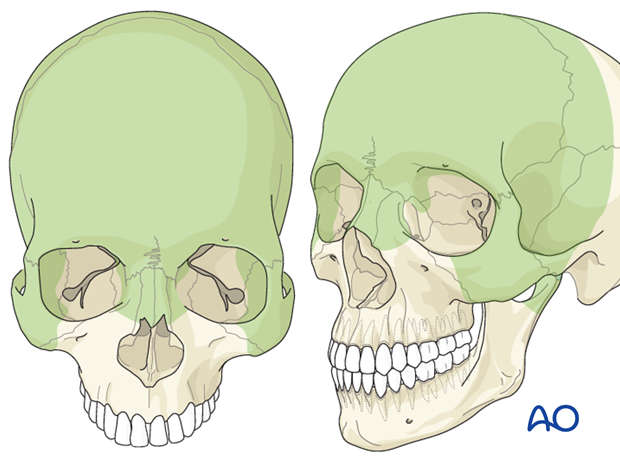
The following areas can be exposed:
- Entire calvarial vault
- Anterior and lateral skull base
- Frontal sinus/Ethmoid
- Zygoma
- Zygomatic arch
- Orbit (lateral/cranial/medial)
- Nasal dorsum
- Temporomandibular joint (TMJ) and condylar/subcondylar region
2. Patient position
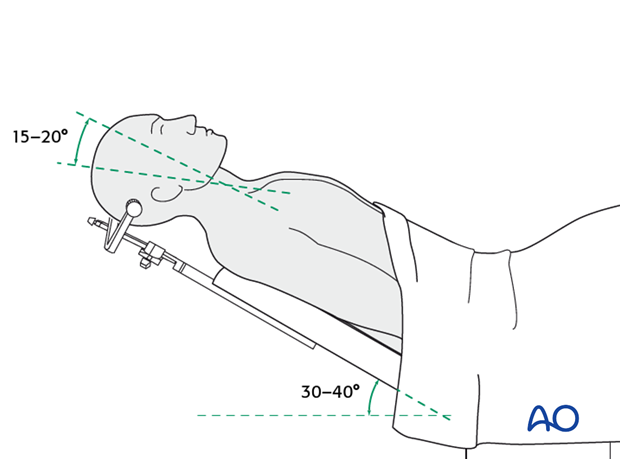
The patient is placed supine on the operation table. The patient’s body is in an slight up-right position (30°-40°) and the head is in 15°-20° retroflexion.
In cases of neurotrauma, it is preferable to fix the head in a head clamp.
Note: Excessive pressure in the application of the head clamp must be avoided.
3. Locating the incision line and preparation
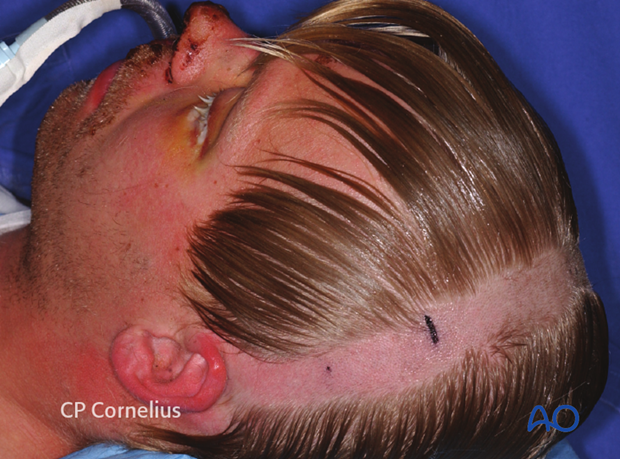
Locating the scalp incision line
The design of the incision line takes account of the hairline of the patient.
In balding men the coronal incision line over the scalp and temporal region is placed several cm behind the hairline.
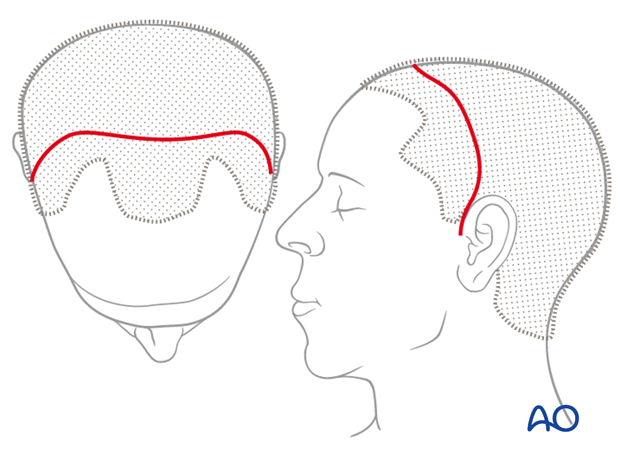
For individuals with male pattern baldness, the incision can be placed as far posteriorly as the upper occiput.
Posterior incisions do not reduce access to the operative field which depends mainly on the inferior extent of the incision.
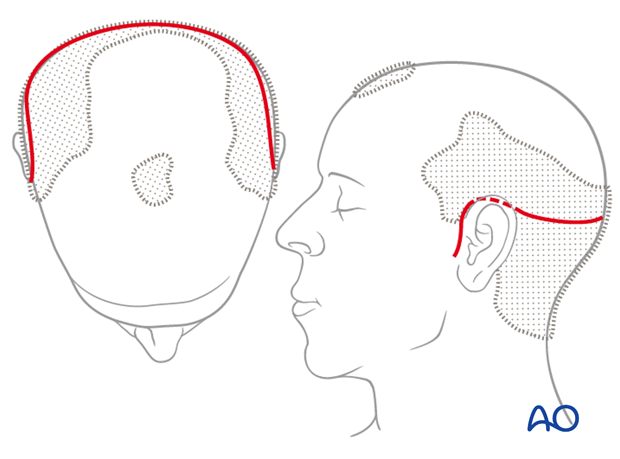
In women and men with no family history of balding, the incision may be placed anteriorly over the vertex slightly behind the palpable coronal suture, leaving 4 – 5 cm hairline in front.
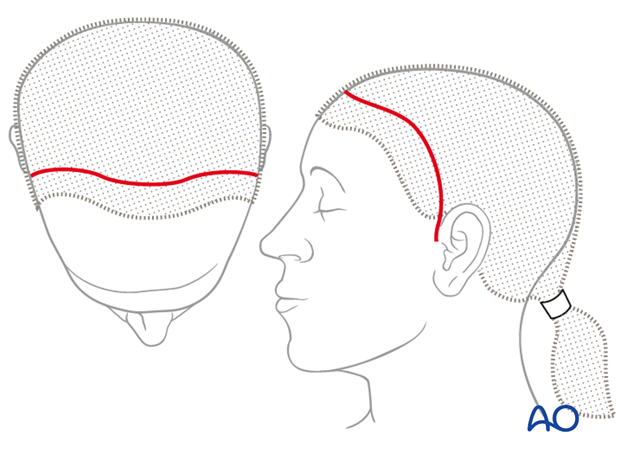
Inferior extent of incision line
The inferior extent of the incision line depends on the region to be surgically addressed.
When exposure is limited to the forehead and the supraorbital region, it is sufficient to extend the incision to the level of the auricular helix.
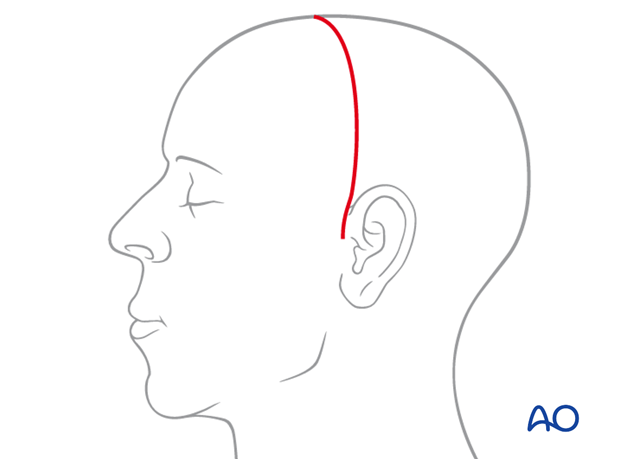
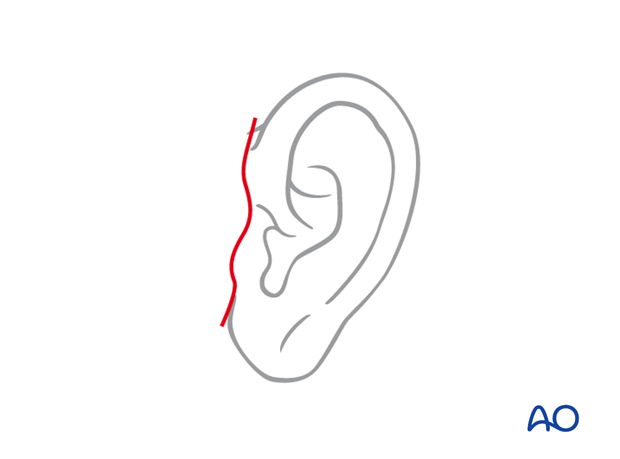
If the zygomatic arch is to be exposed, a preauricular extension has to be added.
If the temporomandibular joint area will be accessed, a preauricular extension down to the level of the earlobe is necessary.
Design of incision
There are several alternatives for the design of the scalp incision.
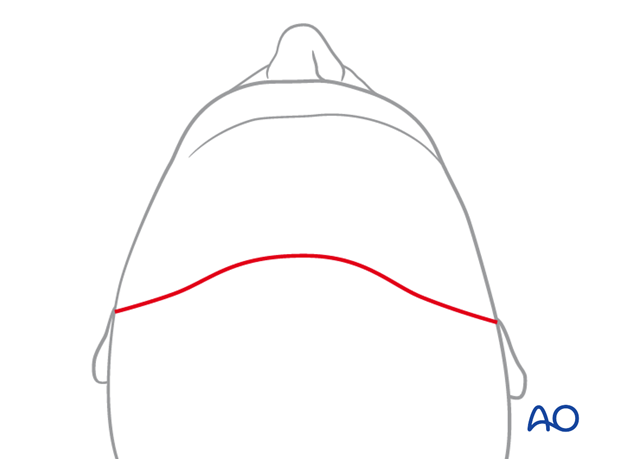
The bow-like incision is traditional.
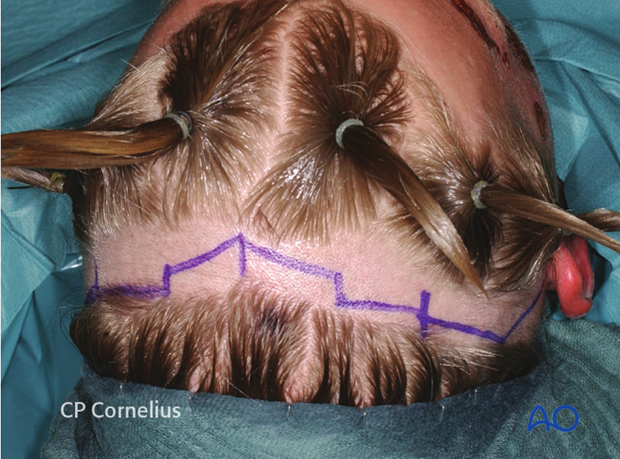
Geometric patterns (zigzag, sawtooth, stepwise, stealth, or wavelike designs) may be used because the scars may be less noticeable especially when the hair is wet. Furthermore, these types of incision allow an accurate reapproximation during closure.
Note: This type of incision may lead to increased risk of wound dehiscence.
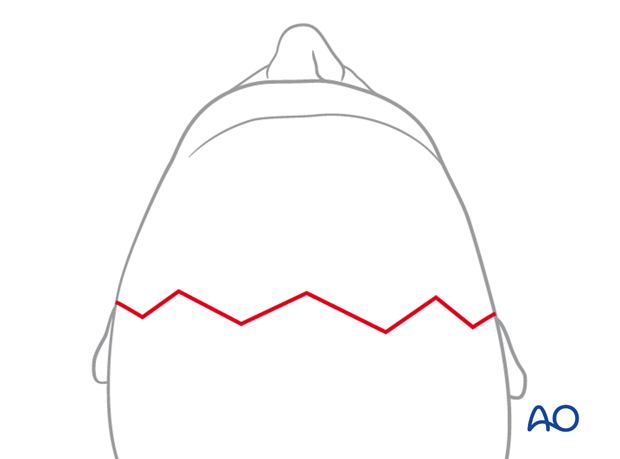
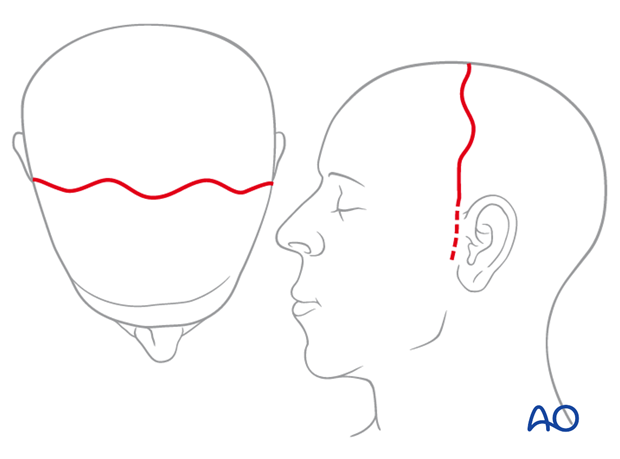
Illustration showing a wave pattern incision design.
Note: Adaptation is sometimes more difficult with this type of incision.
Hair preparation and shaving
There is no medical reason to shave the patient’s hair. However, shaving facilitates wound closure and in this case demonstration of the technique.
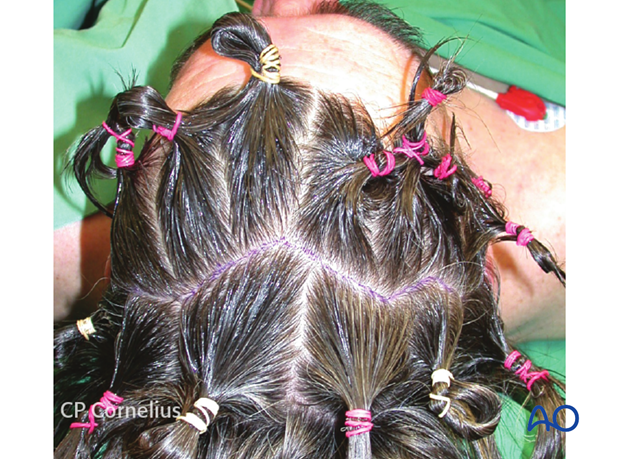
Prior to surgery the hair is shampooed, gelled and combed to separate it according to the planned incision line.
The hair is separated into fields, twisted, and each bundle is secured with elastic bands.
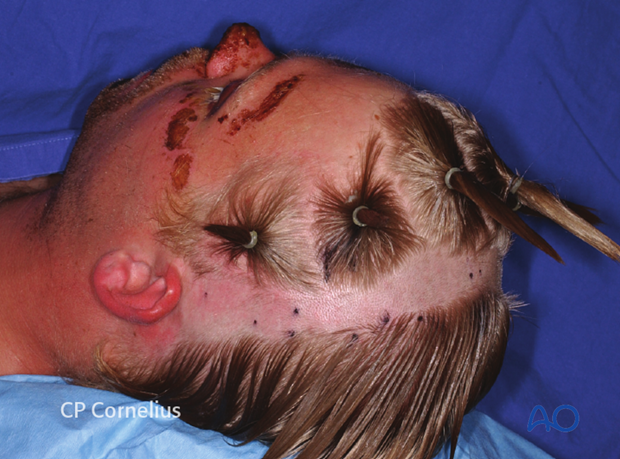
Hair preparation and shaving
Leaving the hair in place will aid in determining the bevel of the scalp incision to minimize peri-incisional alopecia. This is the principal argument against any hair shaving from an aesthetic point of view and is paramount in aesthetic procedures.
Drapes are sutured or stapled (as shown here) to the scalp posterior to the planned incision.
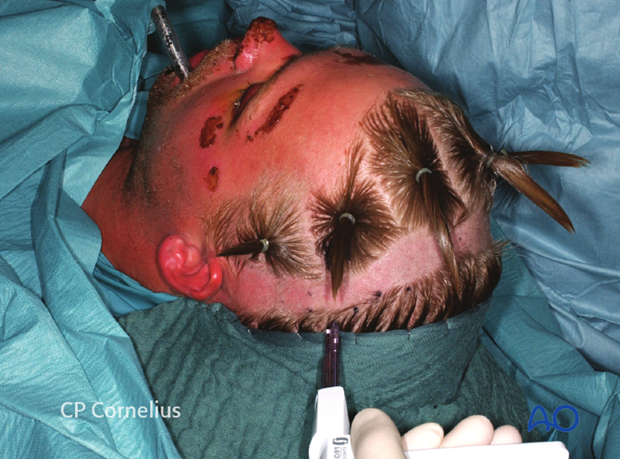
This covers the hair of the posterior scalp.
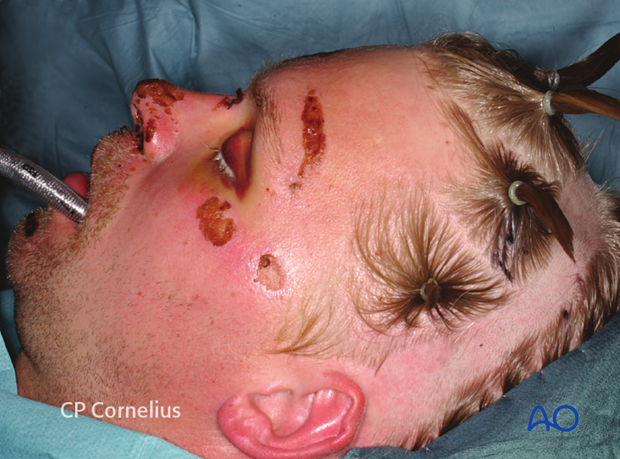
Delineating the sagittal midline and both temporal lines as landmarks helps in the layout of a symmetric incision.
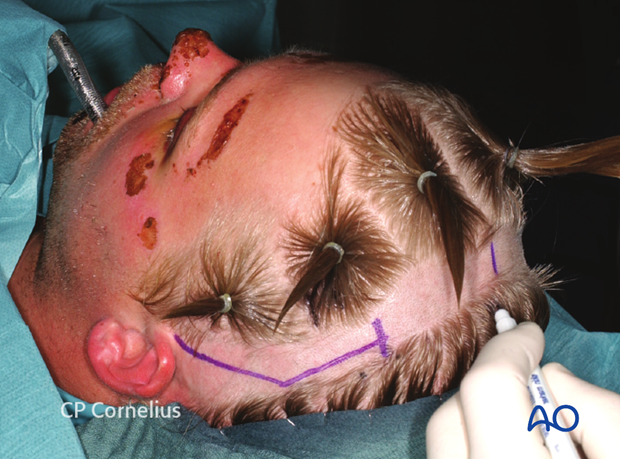
Clinical photograph shows the complete drawing of an extended coronal scalp incision in a stepwise design.
The dorsal extension over the temporal line serves to preserve the deep branch of supraorbital nerve and avoid sensory loss in its terminal skin distribution.
4. Hemostatic techniques
There can be significant blood loss from the coronal incision at the beginning of surgery and during closure. Several techniques may be used to limit blood loss:
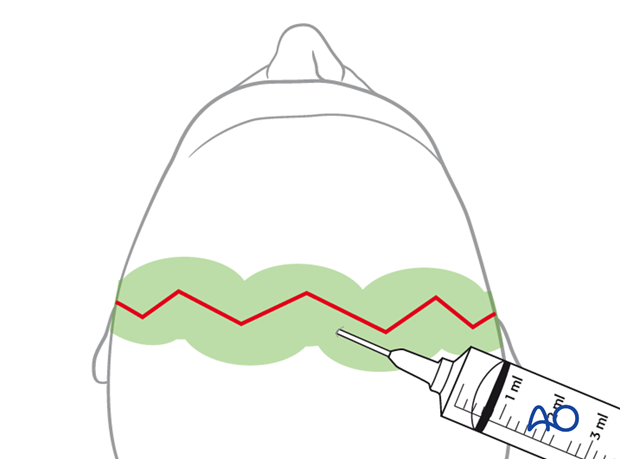
- Infiltration of a vasoconstrictor into the subgaleal plane. As illustrated, the scalp is hyperinflated along the whole length of the incision line for hydrostatic tamponade just prior to the incision Note: this may lead to increased wound dehiscence. Furthermore, at the end of the case the surgeon must ensure meticulous hemostasis of the scalp prior to closure.
- Insertion of running mattress sutures along the sides of the planned incision lines
- Use of heated or cautery scalpels during the incision
- Use of hemostatic clips might be helpful after elevation of the wound edges
A combination of these techniques may also be used.
5. Incision
Additional to marking the actual incision line, crosshatches or tattoo dye markings may be useful to realign the wound edges accurately during closure of the scalp in cases where a bow-like incision is used.
The scalp is the soft-tissue layer of the skull. In simple terms the scalp consists of five layers at the vertex as seen in the schematic representation: skin, dense inelastic subcutaneous connective tissue and fat, galea aponeurotica, loose areolar subgaleal tissue and pericranium.
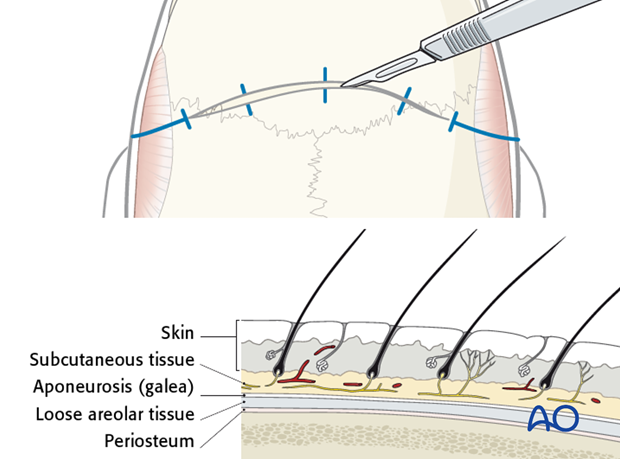
The incision is made with a No.10 blade or a special cautery scalpel to the depth of the pericranium or to the bone.
Dissect this flap in the subgaleal or subpericranial plane depending on requirements.
The pericranium can be raised as a separate, anteriorly pedicled vascularized flap for reconstructive purposes.
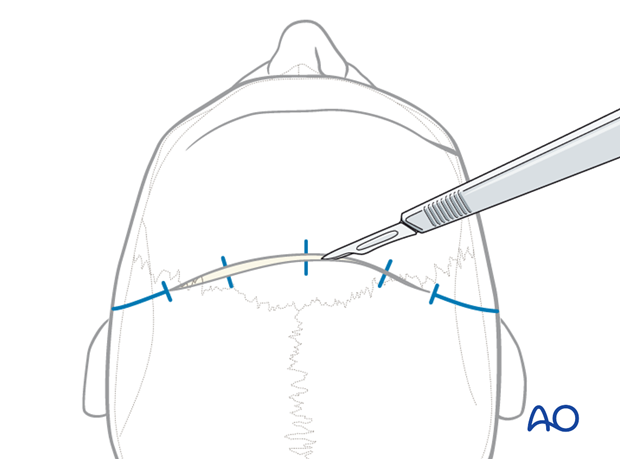
If a pericranial galeal flap is anticipated, the incision stays on top of the pericranium.
Otherwise, the incision goes to the bony surface. In the case that a periosteal flap (also referred to as a pericranial flap) may become necessary, it can be peeled off the underlying soft tissues at a later stage. It is, however, extremely difficult to dissect the pericranium from the subgaleal tissues once the flap has been raised.
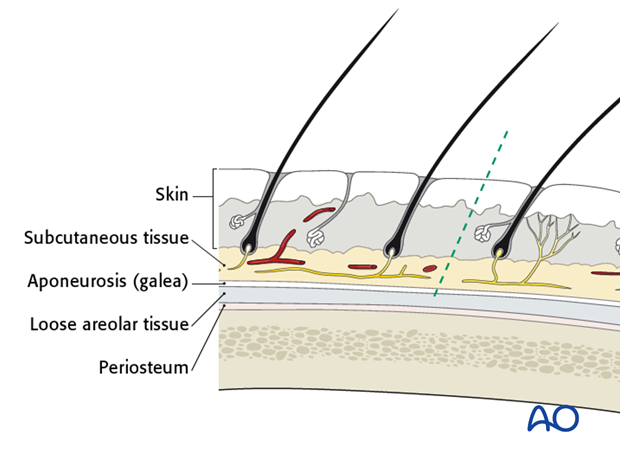
The incision margins are lifted and dissected easily. The dissection in the subgaleal plane is continued for 2-4 cm anteriorly.
Identification and beginning dissection in the loose areolar tissue of the subgaleal plane is shown.
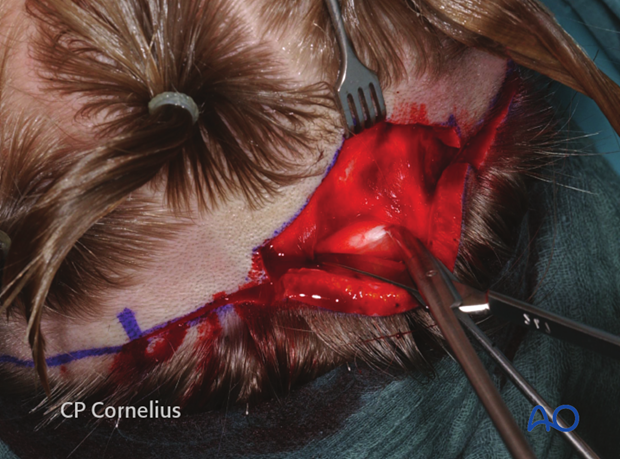
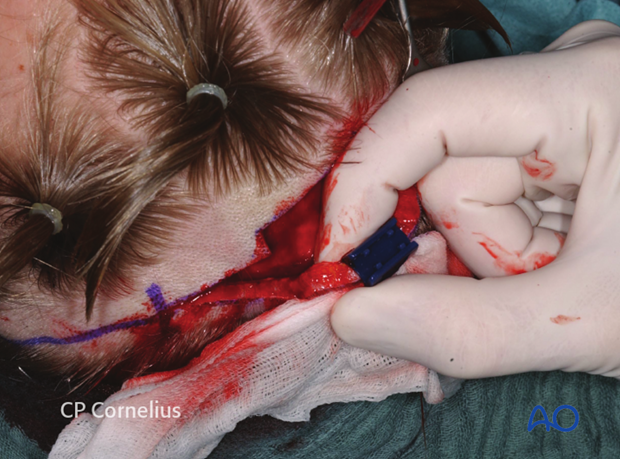
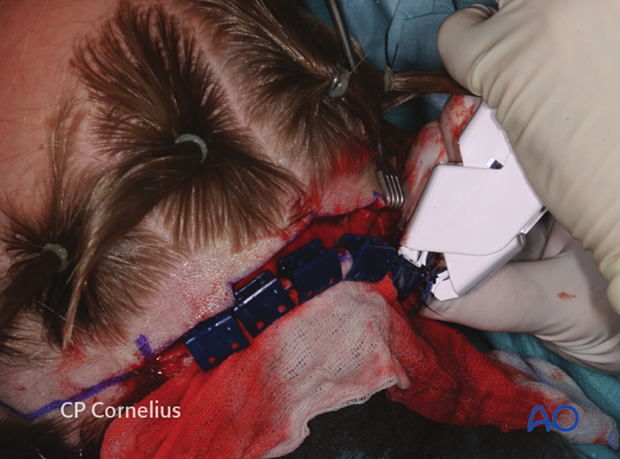
With the raising of the anterior and posterior wound margins bleeding vessels are cauterized and hemostatic clips can be sequentially applied.
Prior to clip application, an unfolded wet gauze sponge can be folded over the wound edges.
Clinical photograph shows the use of a disposable clip delivery device.
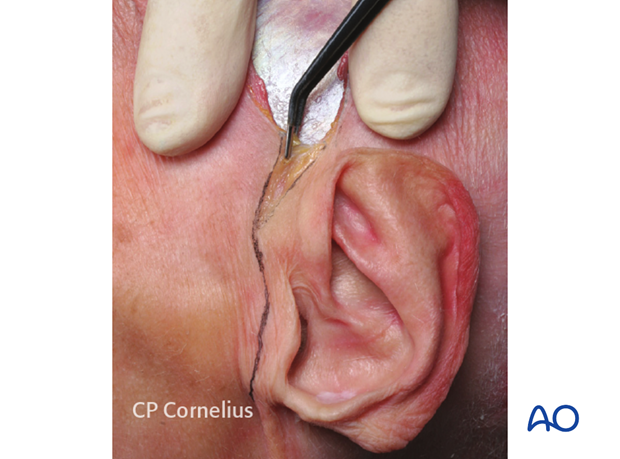
A preauricular extension of the incision can be made within a preauricular skin fold or over the tragus downwards to the level of the earlobe.
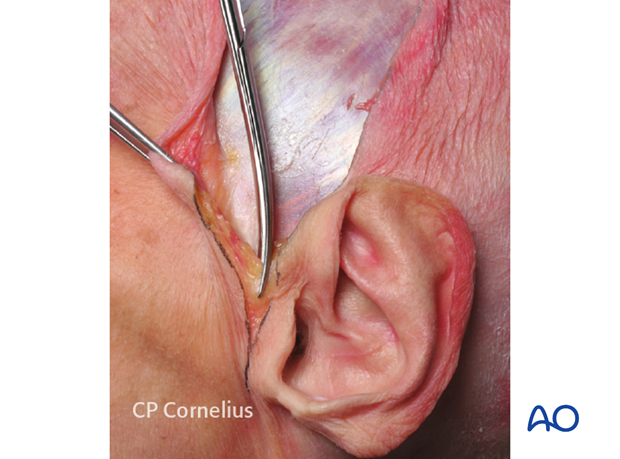
The skin is undermined at the depth of the temporalis fascia and the soft-tissue dissection proceeds under meticulous hemostasis with the use of bipolar cautery as required.
Be aware not making the skin incision more the 1 cm anteriorly to the tragus in order not get in conflict with the facial nerve.
The preauricular muscles are transected and the cartilaginous portion of the tragus and the external auditory canal may be directly exposed.
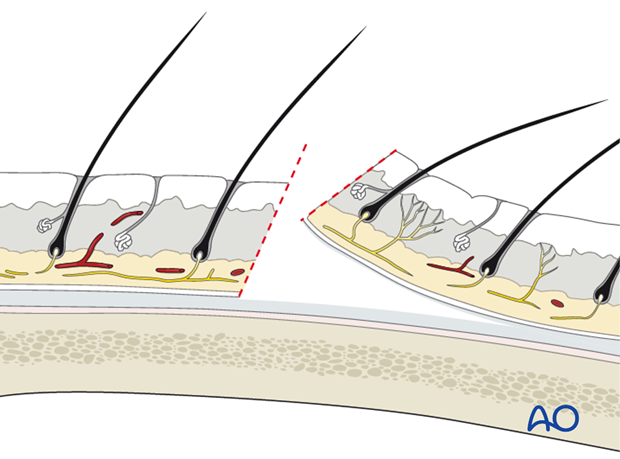
Pearl: beveled incision
The incision should be inclined such that it is parallel to the follicles.
Note: The dissection plane should be above the periosteum to preserve it for possible further reconstruction.
6. Elevation of the Coronal Flap
The coronal flap elevation proceeds anteriorly with a bilateral dissection.
Over the temporalis muscles the silvery white temporalis fascia is gently exposed using sharp dissection.
The temporalis fascia fuses with the pericranium at the superior temporal line.
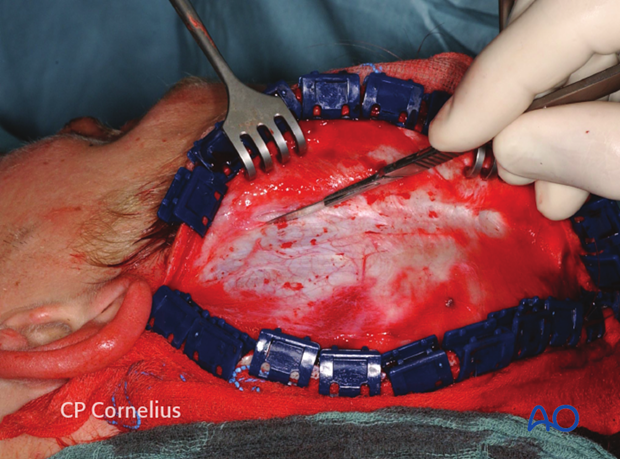
The parietal and forehead portions of the coronal flap are elevated rapidly by cutting the loose areolar connective tissue overlying the pericranium with a scalpel or an electrodissection needle.
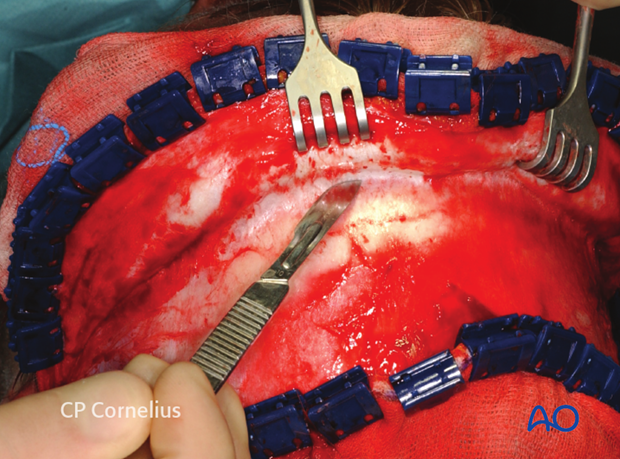
The flap can also be undermined readily with finger dissection or a blunt elevator.
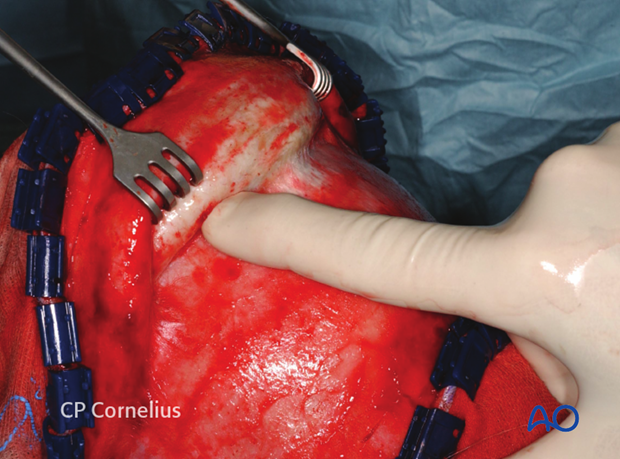
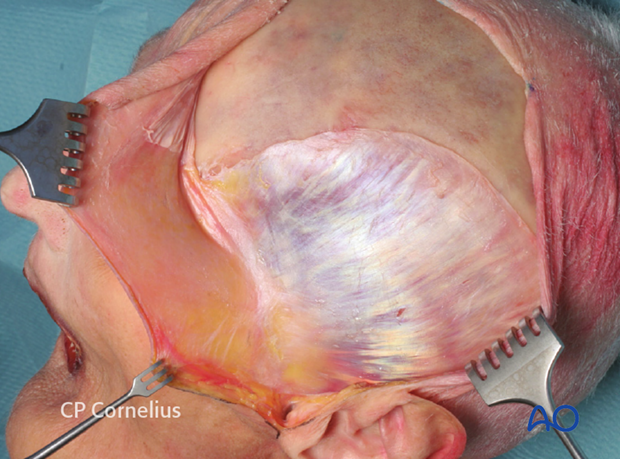
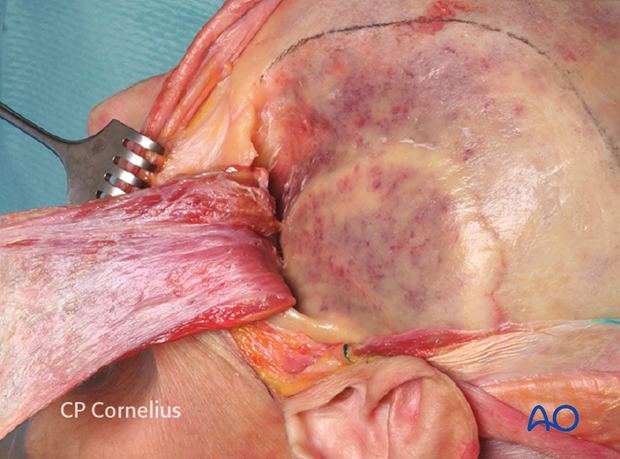
This anatomic specimen shows the silvery white temporalis fascia extending along the lateral aspect of the skull.
Here the pericranium has been incised at the superior temporal line and raised, attached to the coronal flap from the parietal and forehead bone areas.
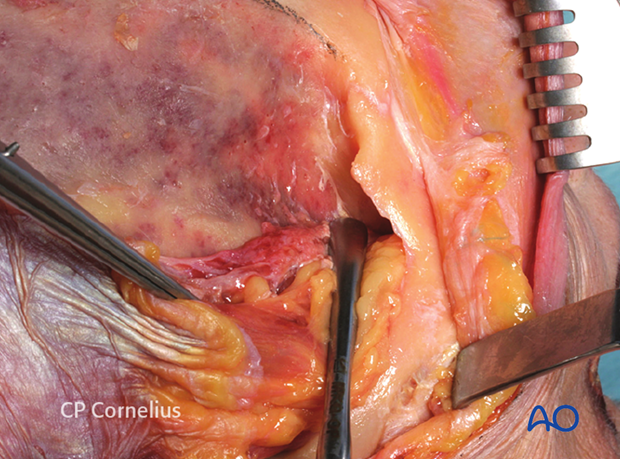
The plane of dissection strictly follows the temporalis fascia downwards and forwards just to the zone where the yellow superficial temporal fat pad shines through.
This zone begins in the lower preauricular area at the level of the root of the zygomatic arch, which is palpable and extends across the temporal fossa to the posterior aspect of the zygomatic body.
When the coronal flap has been sufficiently released anteriorly and inferiorly — more than several centimeters — it can be turned inside out and will passively remain in this reflected position.
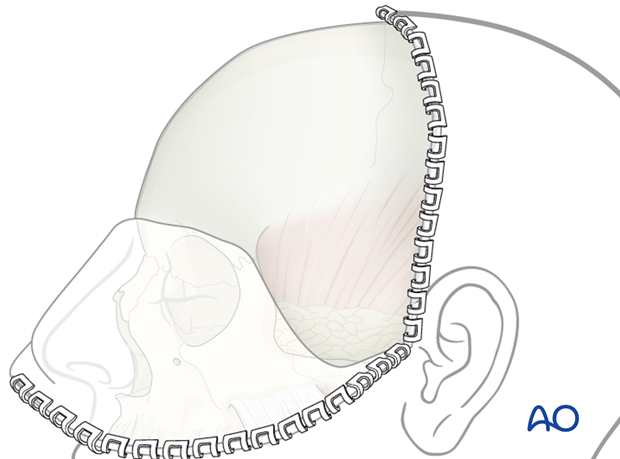
The undersurface of the galea is now superficial on the everted side of the flap.

The dissection of the coronal flap in the subgaleal plane is continued to the level of the supraorbital rims.
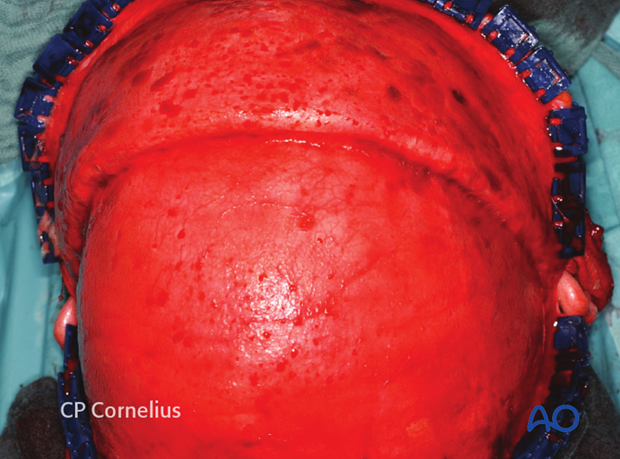
If the pericranium has been left on the skull, there are two options to enter the subperiosteal plane and reach the superior orbital rims and expose the facial skeleton:
- Cross-forehead horizontal incision of the pericranium 2-3 cm above and parallel to the supraorbital rims from one superior temporal line to the other
- Posterior and lateral incisions along the superior temporal line of the pericranium to develop a rectangular anteriorly pedicled vascularized pericranial flap
Cross-forehead horizontal incision
For most procedures of the facial skeleton, the pericranium is incised horizontally across the forehead at a point 2-3 cm above the supraorbital ridges.
The incision extends from one superior temporal line to the other and subperiosteal dissection proceeds forward and downward.
An extension further laterally beyond the superior temporal line requires an incision through the periosteum of the zygomatic process of the frontal bone.

Such an extension releases the tension and facilitates tissue retraction necessary to expose the nasofrontal and supraorbital regions.
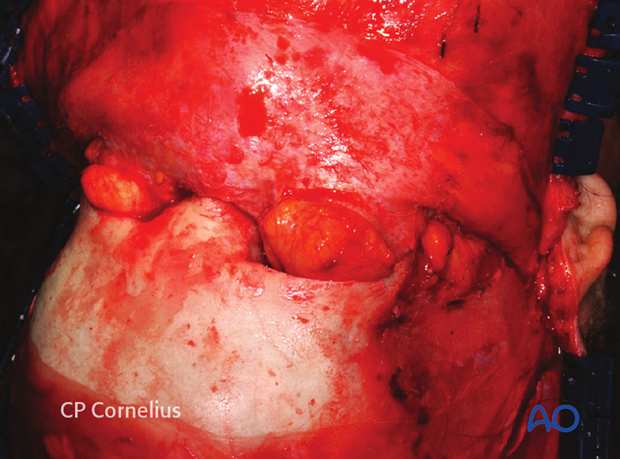
7. Development of (periosteal) pericranial flap
When the frontal sinus and/or anterior cranial base are to be reconstructed, it is advisable to develop a periosteal flap.
An anterior-based pericranial flap is very versatile and can be used in sealing of the nasal cavity in frontal sinus reconstruction, for closure, or obliteration of skull base defects, etc.
The pericranial flap is vascularized by the deep branches of the supraorbital and supratrochlear arteries which course between the galea-frontalis muscle layer and the pericranium. In order not to devascularize the flap during preparation, these layers must not be separated too far anteriorly and downwards.
After supraperiosteal dissection of the coronal flap, the pericranium is incised and elevated from the skull.
To develop a large rectangular flap the incisions through the pericranium are made bilaterally along the superior temporal lines from the anterior to posterior extent of the exposed surface as illustrated.
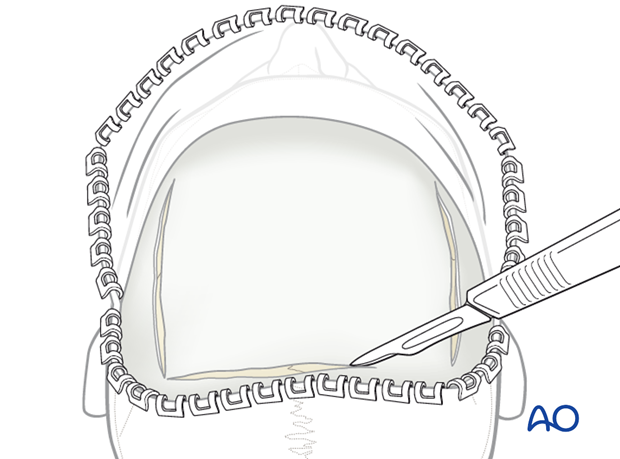
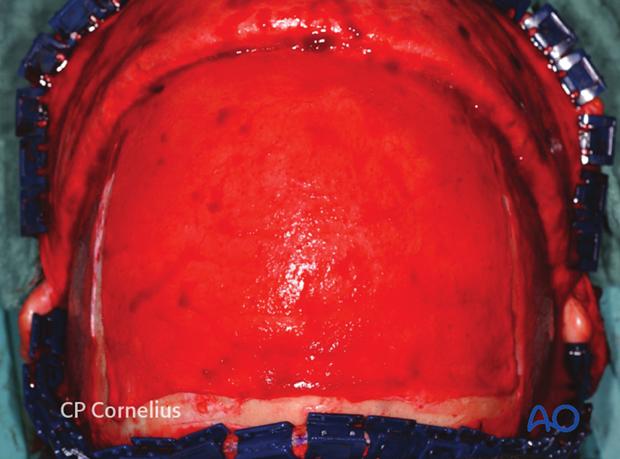
Sharp square periosteal elevators are then used to elevate the pericranial flap. The pericranium adheres loosely and can be raised easily over the parietal and most of the frontal bone. In a transverse band about 2.5 cm wide above the orbital rims however, the pericranium is densely connected to the underlying bone and care must be taken to avoid tissue tearing during the exposure of supraorbital region.
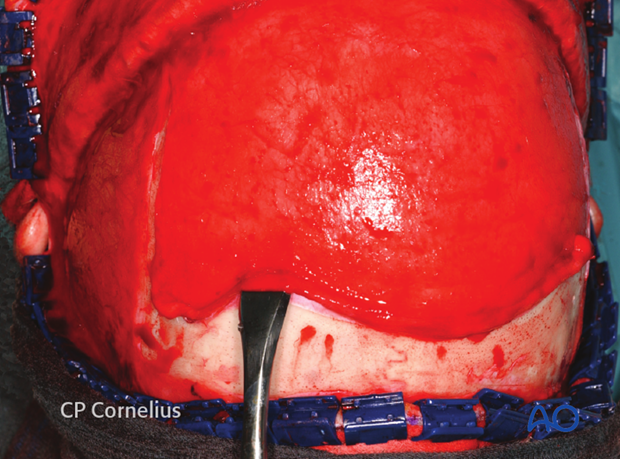
Pearl: using a dry gauze pad
Using a dry gauze pad is also very helpful to prepare the periosteal flap
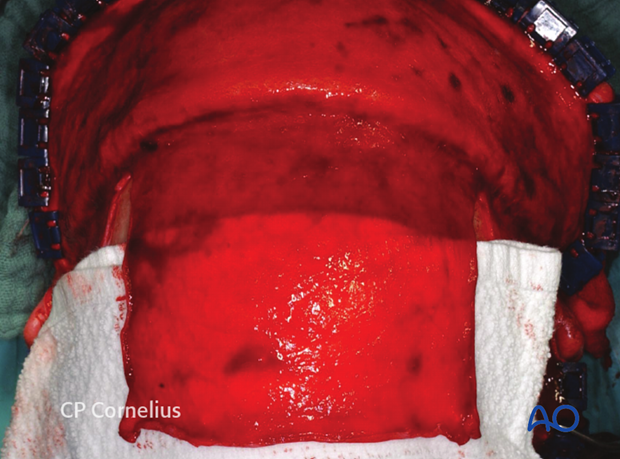
The extensive periosteal flap provides a large apron of vascularized tissue for repair of the frontal sinus and anterior skull base.
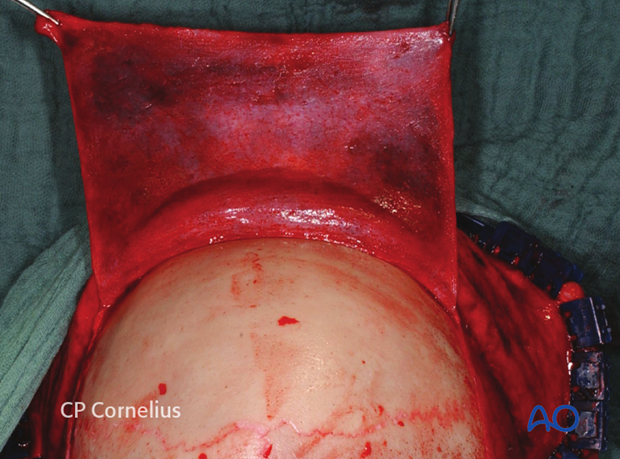
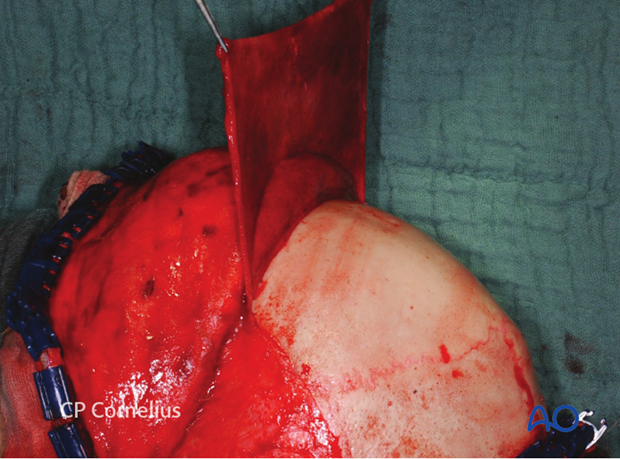
After subperiosteal dissection of the forehead and the supraorbital region, the reach of the flap increases again.
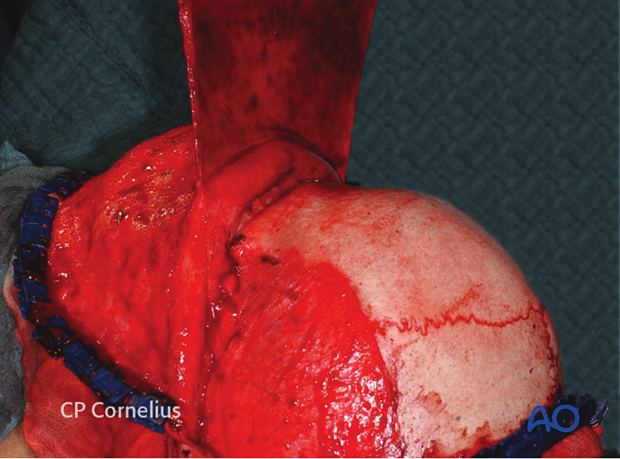
8. Craniotomy
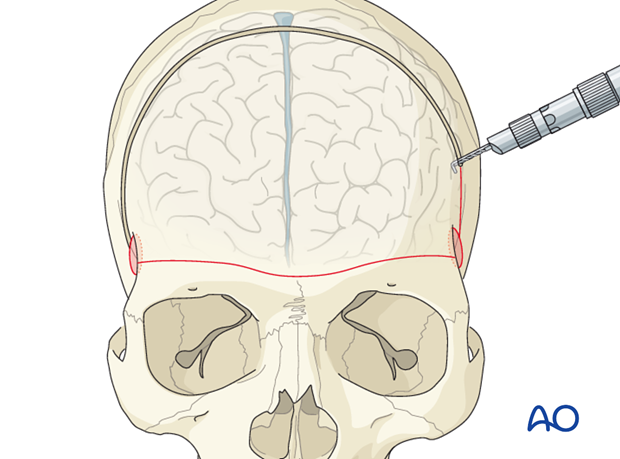
Two burr holes are positioned at the lateral part behind the supraorbital rim.
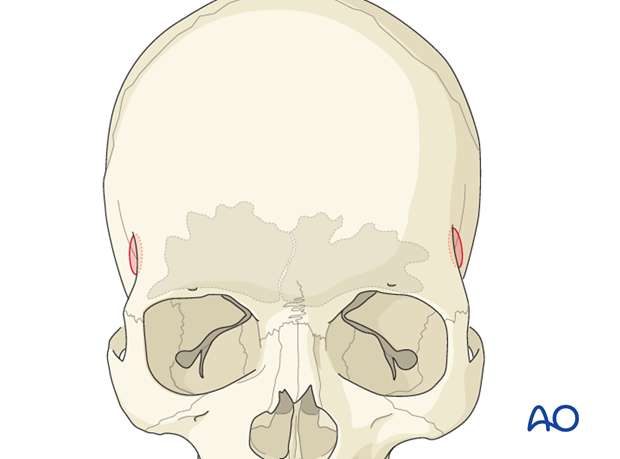
Connect the two burr holes in a course running over the skull using a craniotome. The size of the bone flap necessary depends on the clinical needs.
Due to the configuration of the frontal sinus, the craniotomy has to go mostly through it.
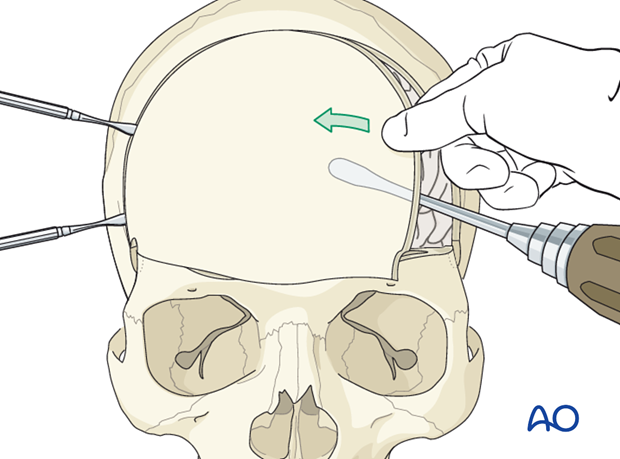
Carefully detach the skull from the dura using an elevator and thereby elevating the bone flap.
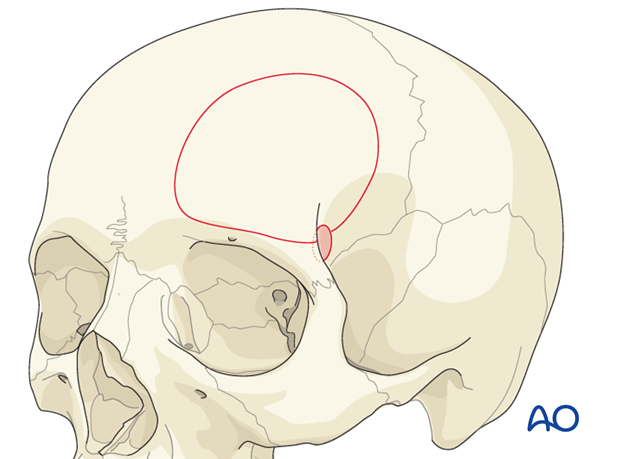
Variants:
1) Unilateral
2) Including parts of the orbital rims (extended transbasal approach)
In the extended approach the frontal sinus is mostly completely removed.
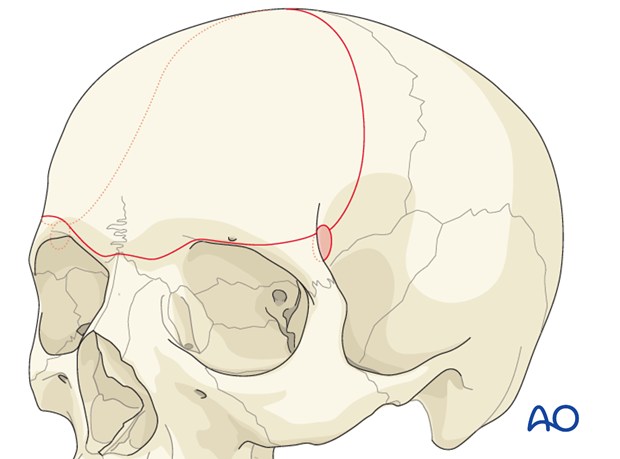
3) Including both orbital ridge (extensive transbasal approach)
This kind of approach is only used in very selected cases with special trauma.
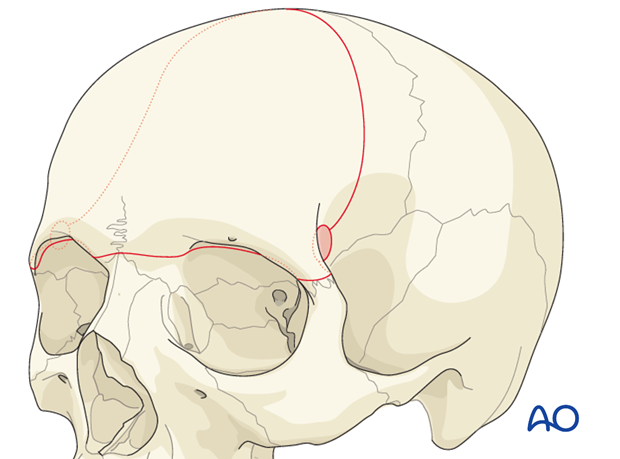
Alternative: using burr holes at the coronal suture
If one is concerned because of the sagittal sinus, using two burr holes at the level of the coronal suture at least 1 cm away from the midline can be used in order to avoid injury to the superior sagittal sinus (SSS).
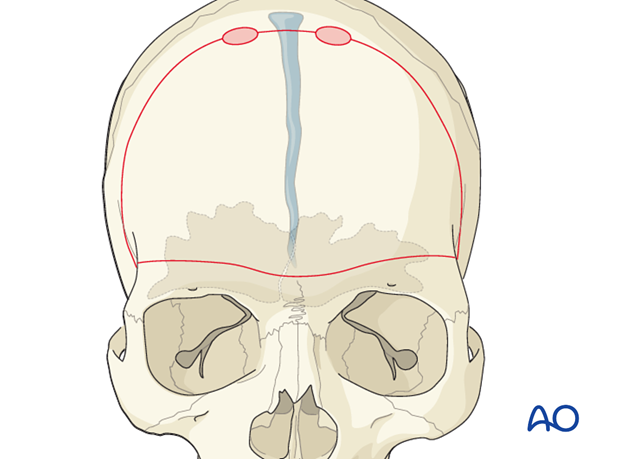
Bilateral Craniotomy
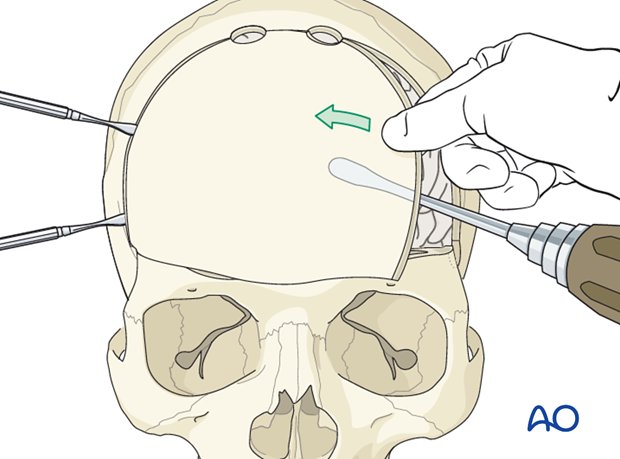
To reach bilaterally the supraorbital rims, a craniotome is inserted into one of the burr holes and worked through the bone.
The course of the craniotomy runs through the frontal sinus.
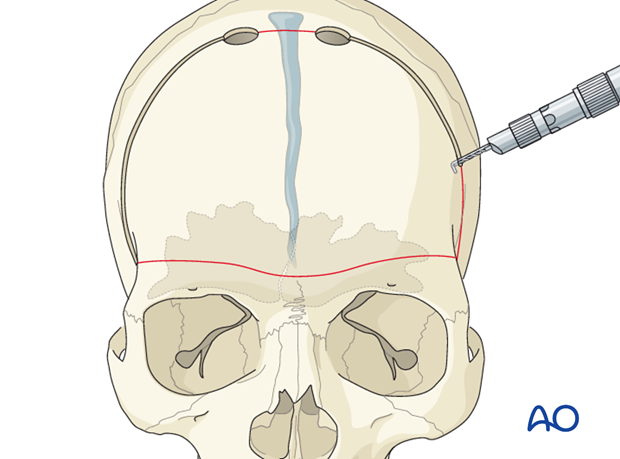
Linking the burr holes
Carefully dissect the dura from the internal table of the skull. Then, connect the burr holes using a craniotome.
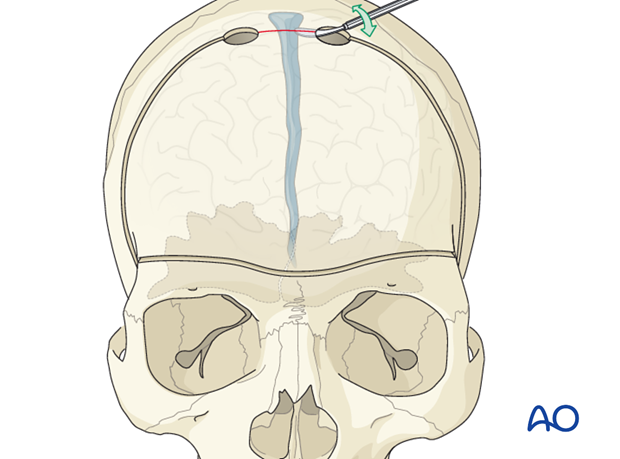
Carefully detach the skull from the dura using an elevator and thereby elevating the bone flap.
9. Incision of the superficial temporal fascia for exposure of the zygomatic arch
The lateral dissection of the coronal flap is continued from the subgaleal plane of the scalp to the temporal region. The dissection strictly follows the temporalis fascia.
As soon as the yellow outline of the superficial temporal fat pad is visible shining through the superficial layer of temporalis fascia, an oblique incision through the fascia extending from the root of the zygomatic arch to the superior-posterior aspect of the lateral orbital rim is made.
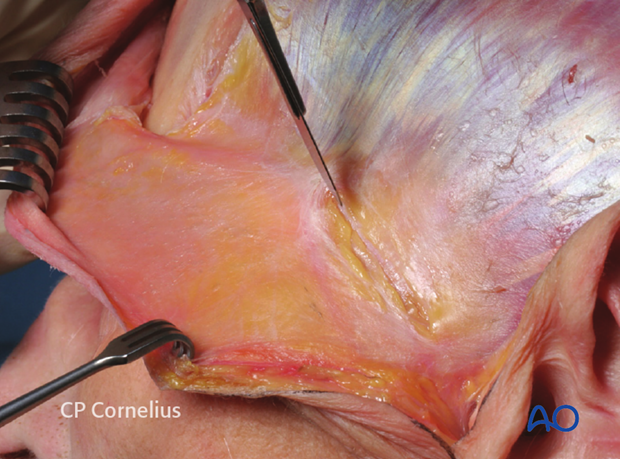
Illustration shows oblique incision of superficial layer of temporalis fascia.
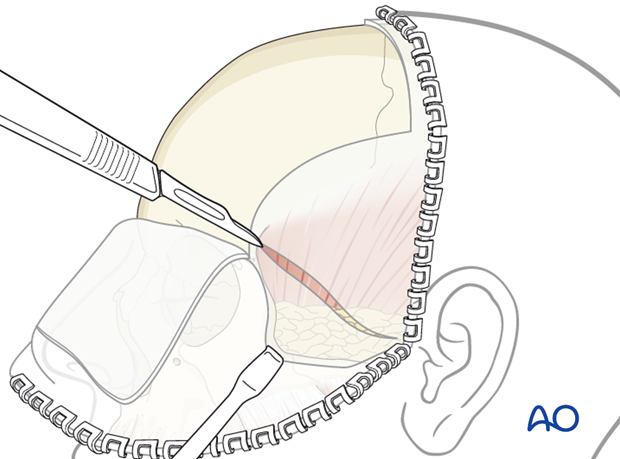
The dissection downward to the arch and the posterior (temporal) margin of the zygoma is made immediately on the lateral surface of fat pad right underneath the superficial layer of the temporalis fascia.
This plane can be conveniently discerned using a sharp scalpel dissection.
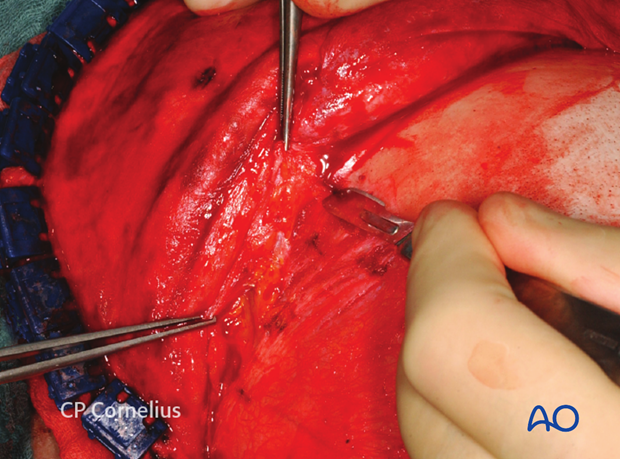
This plane of dissection allows for the protection of the temporal branch of the facial nerve as shown in the illustration.
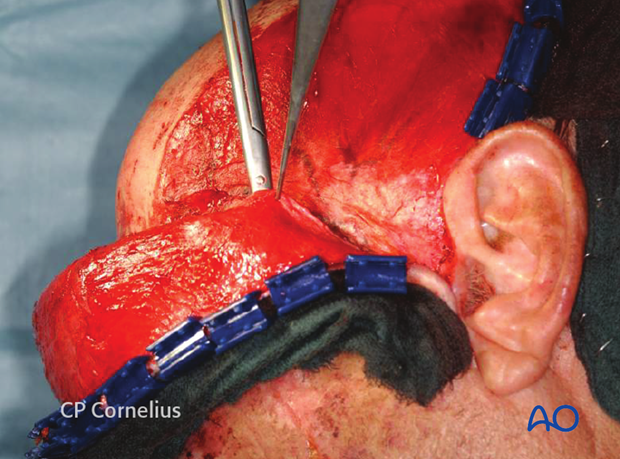
Alternatively, the elevation of the superficial layer of the temporalis fascia in the dissection to the zygomatic arch can be done bluntly using scissors.
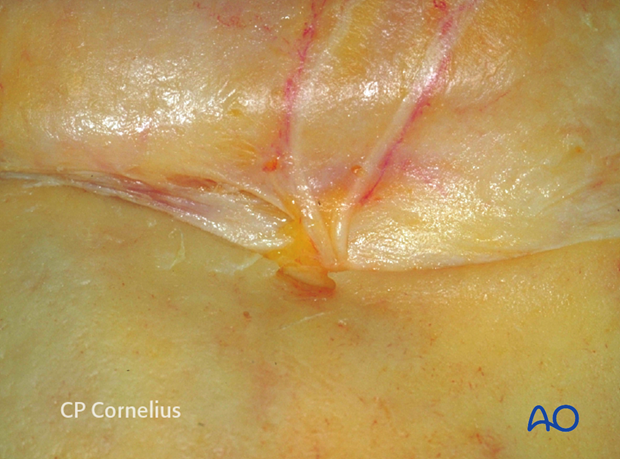
A common complication of the temporal fat pad approach is a hollowing of the temporal fossa, which may represent a significant cosmetic deformity. Current understanding is that postoperative temporal hollowing is a consequence of a fat atrophy caused by devascularization, denervation, or displacement of the fat pad. In order not to injure the connective tissue septations suspending the fat pad and to prevent inferior sagging, the dissection should be kept on the lateral surface.
Transsection of the branches of the zygomaticotemporal nerve travelling perpendicular through the fat pad, however, is unavoidable.
10. Subperiosteal exposure of the orbits and upper midface
Release of the supraorbital neurovascular bundle
To extend the supraorbital dissection inferiorly to the nasofrontal area and over the orbital rims into the upper circumference of the orbital cavity it is necessary to release the supraorbital neurovascular bundle, which either exits through a bony foramen or runs across a more or less pronounced bony notch.
If a supraorbital foramen is found this is converted into a notch. A small osteotome or a piezosurgery tip can be used to remove a small bone wedge underneath the bundle and subsequent release.
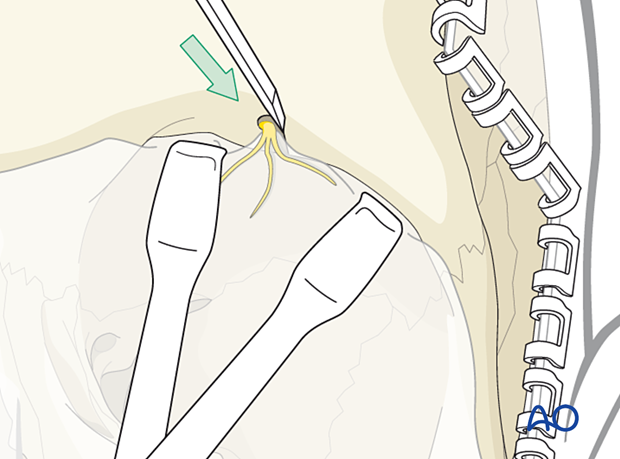
Once the neurovascular bundle has been released from its foramen, a complete subperiosteal dissection is performed allowing access to the orbital roof and medial wall.
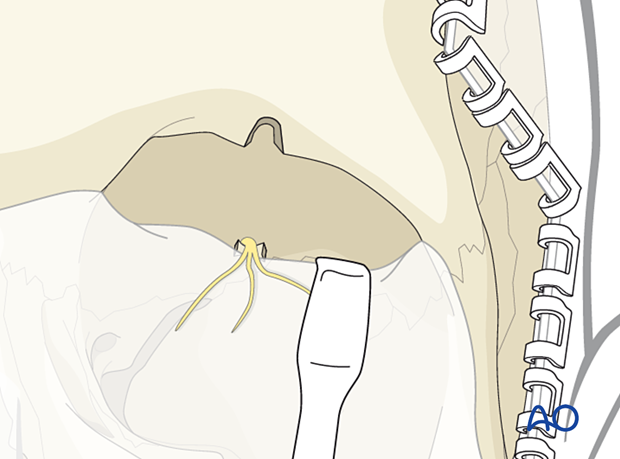
Release of the supraorbital neurovascular bundle
If no foramen is present, the neurovascular bundle is simply reflected together with the periorbital dissection from the bone as shown. In this example the trochlea is still attached superomedially next to the shallow supraorbital furrow.
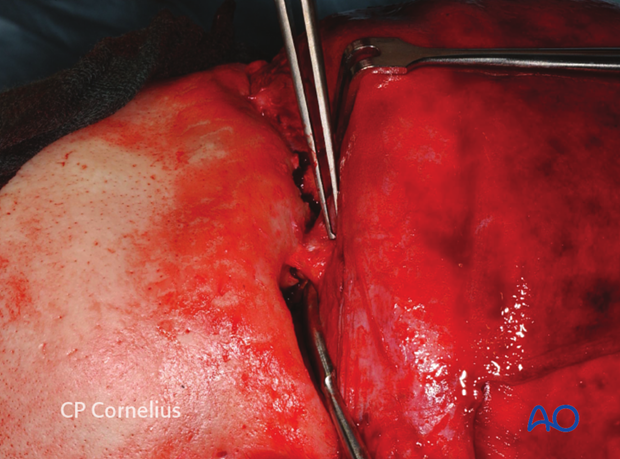
Further retraction of the flap inferiorly is accomplished by subperiosteal dissection into the orbits.
The periorbita is dissected 180° off the adjacent superior medial and lateral orbital walls into the midorbit as shown after release of the supraorbital nerves.
If necessary the dissection can continue even deeper into the orbit.
For exposure of the nasofrontal and the nasoethmoid region as well as the medial orbit, the trochlea needs to be disinserted together with its connective tissue attachments from the frontal bone.
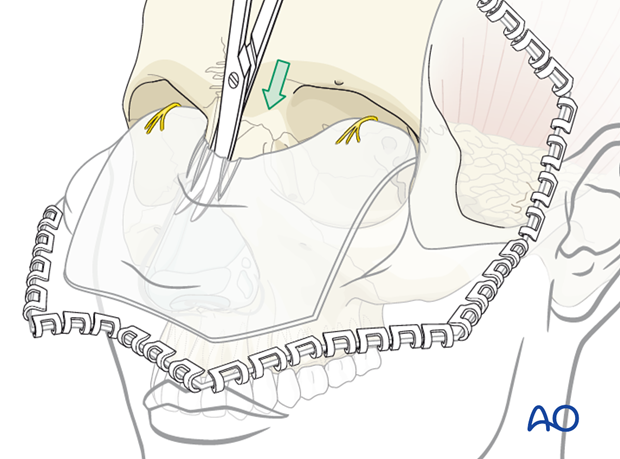
Short sagittal incisions through the periosteum over the midline of the nasal dorsum will release the soft-tissue tension and facilitate the retraction of the coronal flap down to the osteocartilagineous junction.
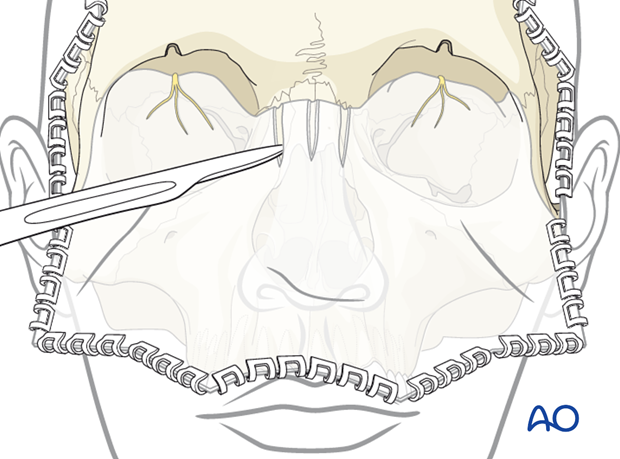
Dissection to the tip of the nose can then be readily carried out with scissors.
The elevation of the periorbita from the lateral orbital wall detaches the lateral canthal tendon that is closely connected to the periosteum over the lateral orbital rim (black arrows in anatomic specimen) and lateral orbital tubercle (Whitnall).
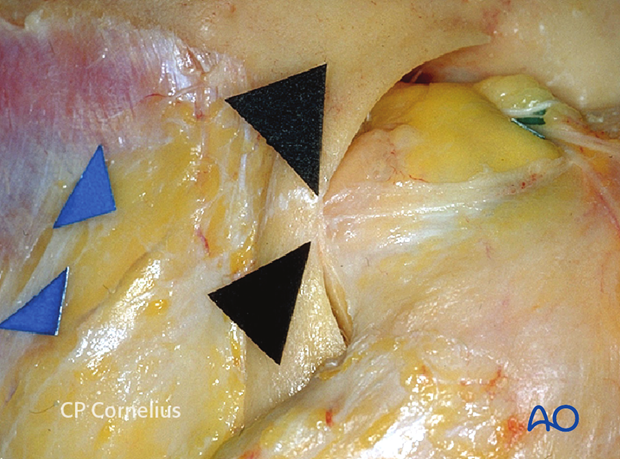
Dissection deep into the lateral orbit exposes the suture line between the orbital flange of the zygoma and the greater wing of the sphenoid (sphenozygomatic suture).
The dissection of the lateral orbital wall is demonstrated anatomically.
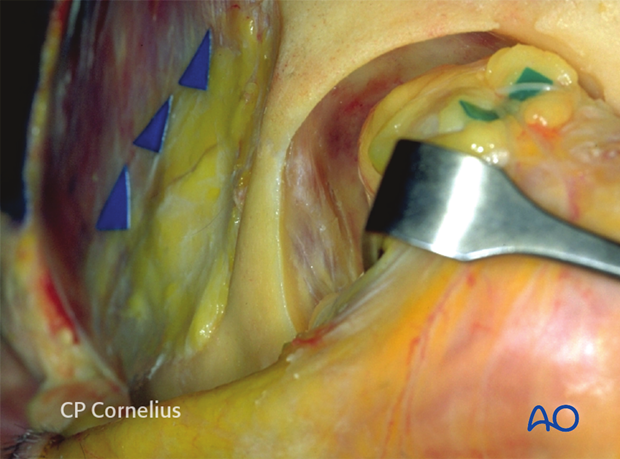
The dissection of the lateral orbital wall is demonstrated in a clinical case.
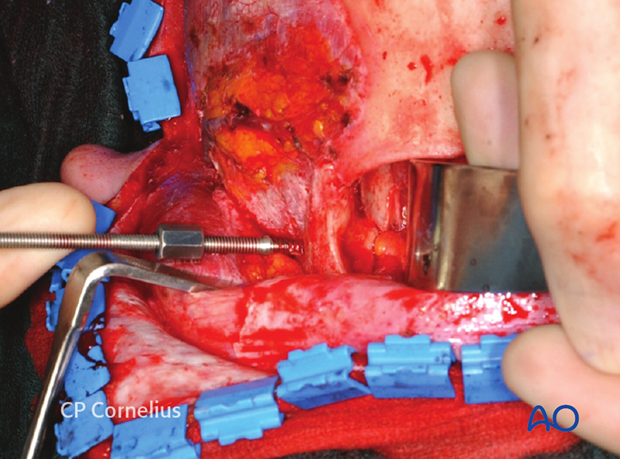
The lateral subperiosteal dissection can be continued from the lateral orbital rim downward over the body to the inferior border of the zygoma.
Medial extension at this level provides exposure of the lateral half of the infraorbital rim to the infraorbital nerve and foramen.
This approach allows access to the lateral wall of the orbit. For full access to the orbital floor and the medial half of the infraorbital region it is advantageous to complement the coronal flap approach with transcutaneous or transconjunctival incisions in the lower eyelid.
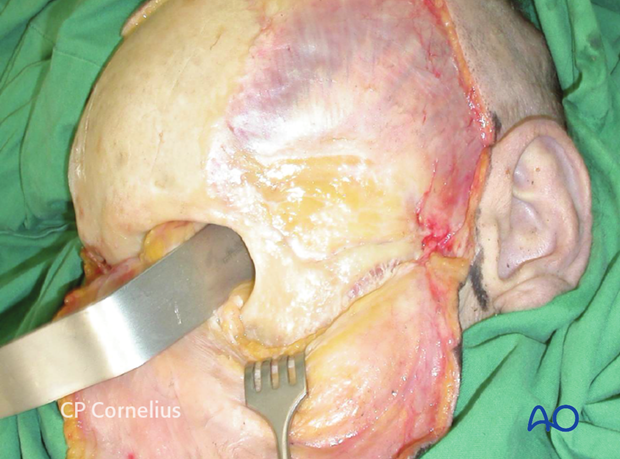
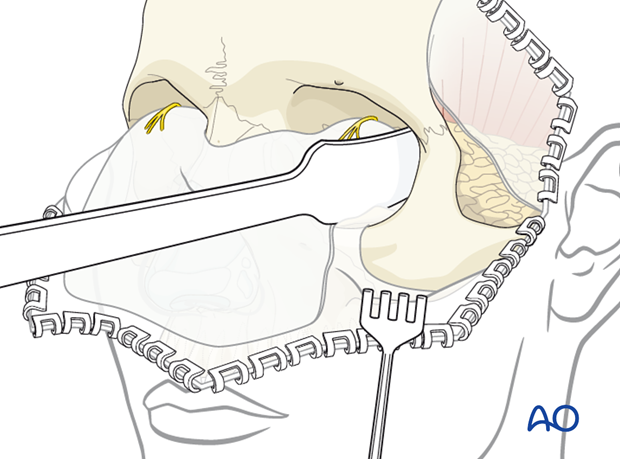
This illustration demonstrates the maximum amount of midfacial exposure obtainable through a coronal approach.
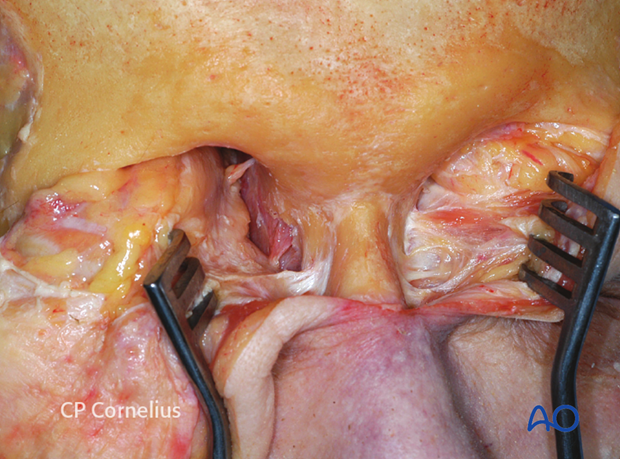
The anterior fibrous and muscular components of the medial canthal tendon fan out medially and insert into the nasofrontal maxillary process (left side of anatomic specimen).
The anterior branch of the medial canthal tendon is identified as a firm fibrous strand (right side of anatomic specimen) that should be left intact during the subperiosteal medial rim dissection. The dissection is stopped at the upper end of the nasolacrimal sac within the lacrimal fossa. The anterior branch of the medial canthal tendon is then reflected anterolaterally, to elevate the lacrimal sac out of the fossa.
The posterior branch of the medial canthal tendon passes to the posterior lacrimal crest and is only rarely detached from the bone. If detached, it must be reattached prior to closure.
Note: never use sharp wound hooks as shown in this photograph.
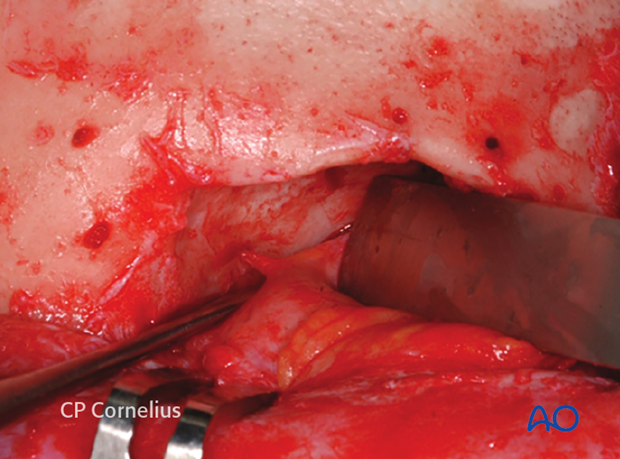
The medial orbital wall can be exposed leaving the medial canthal tendon apparatus intact.
When the periorbital dissection is continued further posteriorly towards the midorbit and apex, the anterior and posterior ethmoidal arteries are encountered along the frontoethmoidal suture.
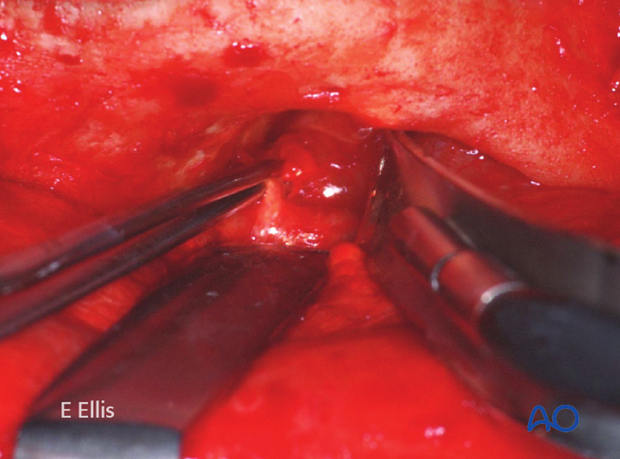
The ethmoidal arteries are covered with the periorbita like a tent adherent to the foramina as demonstrated in anatomic and clinical example.
A bipolar cauterization and transsection of the vessels may be performed for extended exposure.
11. Exposure of the temporal fossa
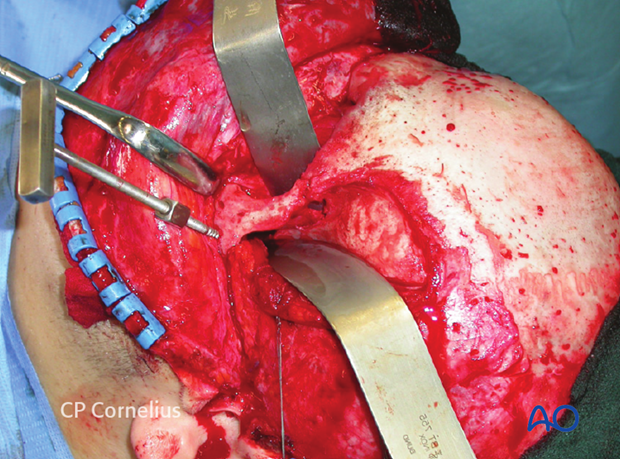
If additional exposure of the external aspect of the lateral orbit and the infratemporal fossa (pterional region for transcranial access to the orbital apex) is required, the temporalis muscle is dissected from its bony attachments either limited to the anterior edge or over the entire surface of the temporal fossa.
Relaxing incisions may be placed through the temporalis fascia and the muscle substance as used for the development of a temporal muscle flap.
The vascular supply (deep temporal vessels) of the temporalis muscle ascends deep from the infratemporal fossa and must be preserved.
The temporal surfaces of the zygoma, the lateral orbital wall, the greater wing of the sphenoid (GWS), the temporal, and frontal bones are exposed with periosteal elevators.
A 1 cm soft-tissue cuff (periosteal strip and muscle) is left below the superior temporal line to reattach the temporal muscle at the conclusion of the procedure.
12. Harvesting cranial bone grafts
The cranial vault offers a large stock for harvesting calvarial bone grafts.
Depending on the type and size of the defect to be repaired, various harvesting techniques can be used.
If a cross-forehead incision through the pericranium has been chosen as a route to the orbits and midface, a second incision has to be made posteriorly to gain exposure to parietal donor site area (see illustration).
If the pericranium has been elevated posteriorly already, the dorsal wound edges may be reflected posteriorly for additional exposure of the donor site.
Note of caution:
Even the harvesting of outer table calvarial bone grafts is associated with potential intracranial morbidity. Therefore the graft should be taken from the skull over the non-dominant hemisphere.
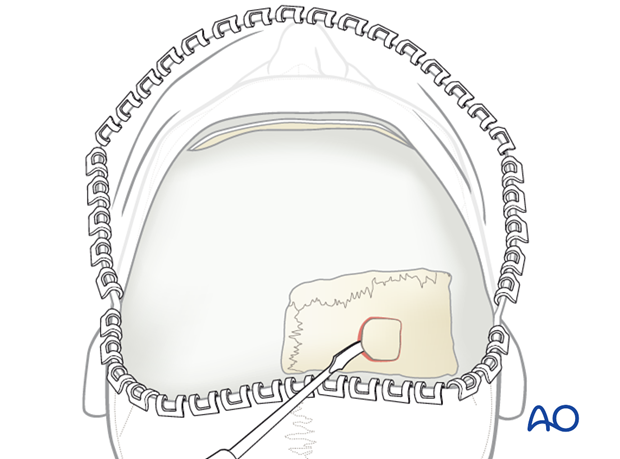
The parietal bone is the most appropriate source for cranial bone grafts. The inner and the outer cortex is thick with a wide diploë in between.
The harvesting area should stay away 1.0 to 1.5 cm from the cranial suture lines, in particular from the midline, in order to prevent injury to the sagittal sinus.
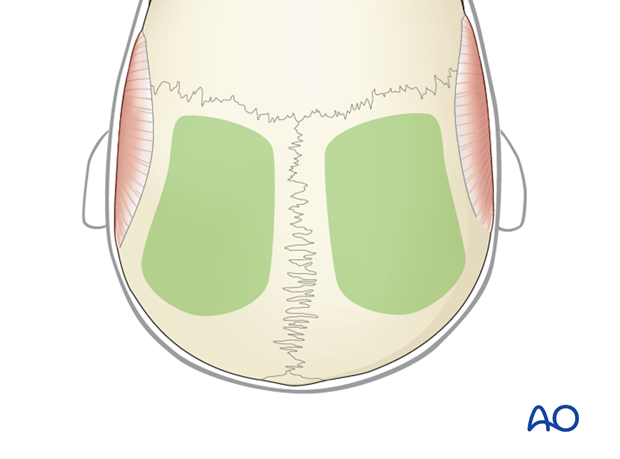
There are several types of calvarial bone grafts that may be taken:
Shaved corticocancellous outer table graft with attached pericranium
These small grafts are taken with a sharp osteotome after scoring their outlines with a side-cutting burr or by direct tangential cutting off a bone convexity with a reciprocating or oscillating saw. The resulting bone splinters are held together by the pericranium left on the surface. The thin grafts will curl and are malleable within certain limits.
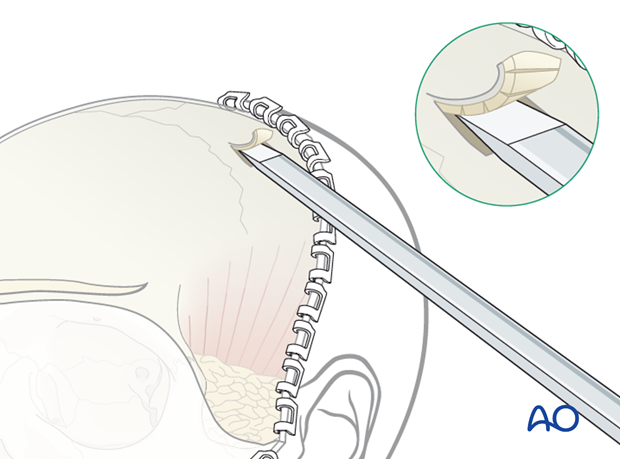
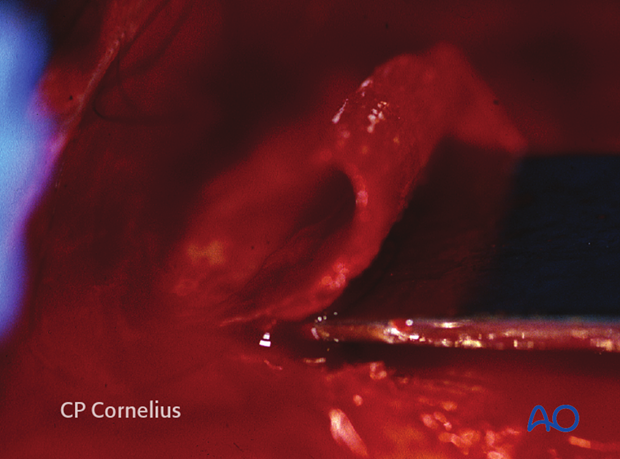
In situ split outer table grafts
For such grafts the outer table is split from the inner table at the level of the diploic layer.
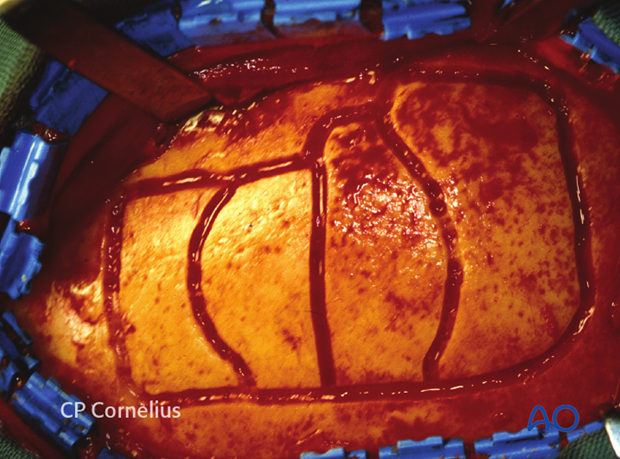
The grafts are taken in strip segments either single or in a series.
The segments are oriented either in a sagittal or transverse direction.
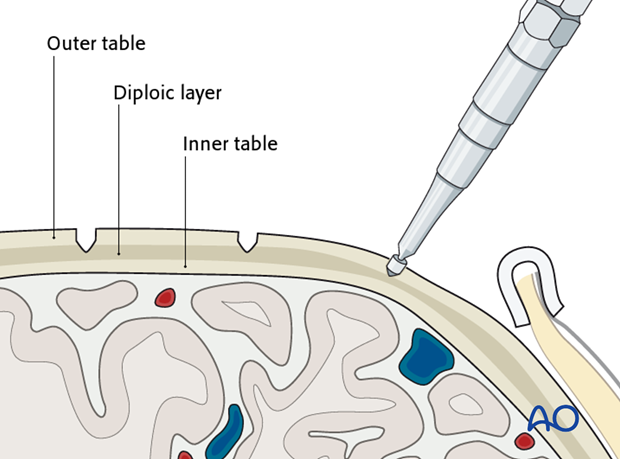
The outline of the grafts is traced with a side-cutting burr or a saw.
The initial grooves are deepened to the level of the diploë.
The diploë must be visible, which is indicated by cancellous bone bleeding.
A trough is created along the side of the bone graft by tangential saw cuts. The outer edges are beveled smooth to give a flat access angle for an osteotome and thereby permit calvarial splitting.
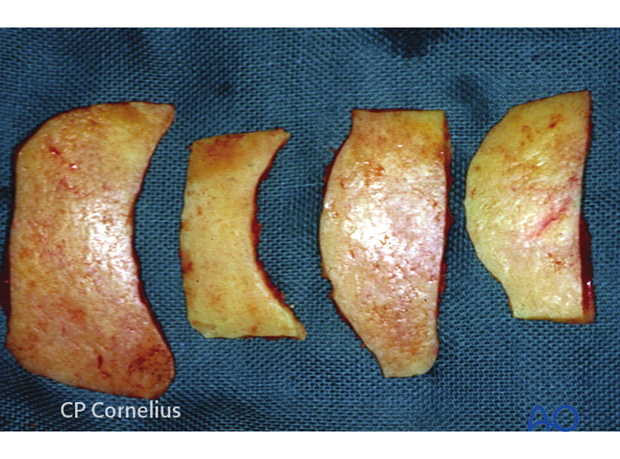
The outer cortex grafts are separated from the calvarium by sequential advancement of thin osteotomes through the diploic layer.
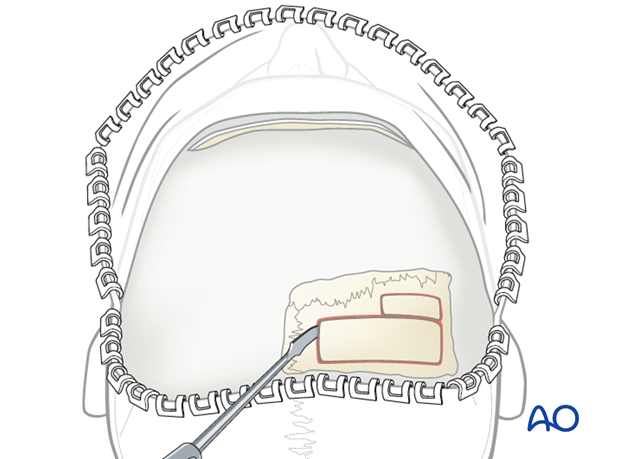
Depending on what is required, the outer table grafts are sized to a width of up to 20 mm and may be slightly curved.
Full thickness parietal bone grafts
These grafts are removed with a formal craniotomy and are indicated if long biparietal bone struts across the sagittal sinus or grafts with special curvatures are required.
Burr holes are made with a trephine followed by dural dissection and craniotomies.
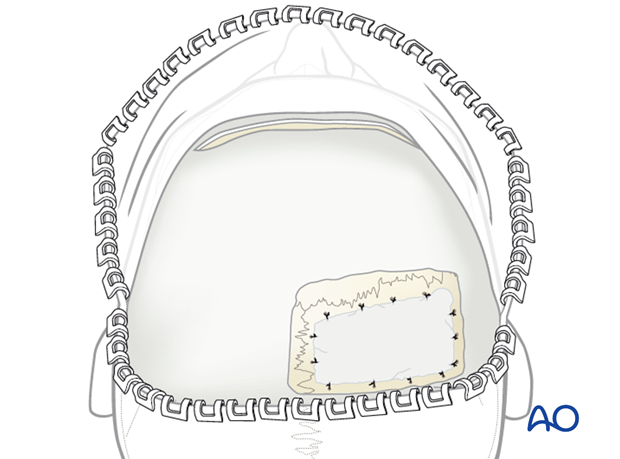
The harvested bicortical parietal bone can be split into its two laminae. The inner cortex is used for facial reconstruction while the outer cortex is returned to cover the donor site.
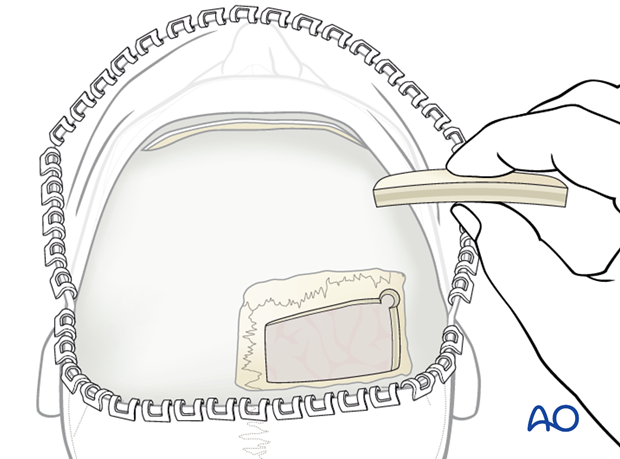
Dural suspension at the edges of the craniotomy may be performed.
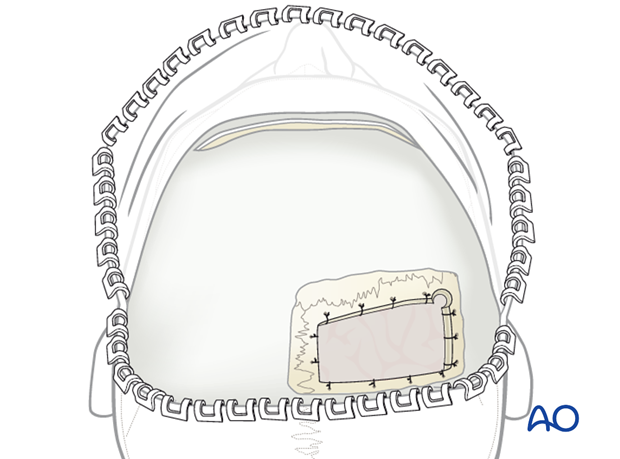
Instead of replanting the outer cortex, small bony defects can be filled with bone graft substitutes and/or covered with titanium mesh.
Bone paste or bone dust
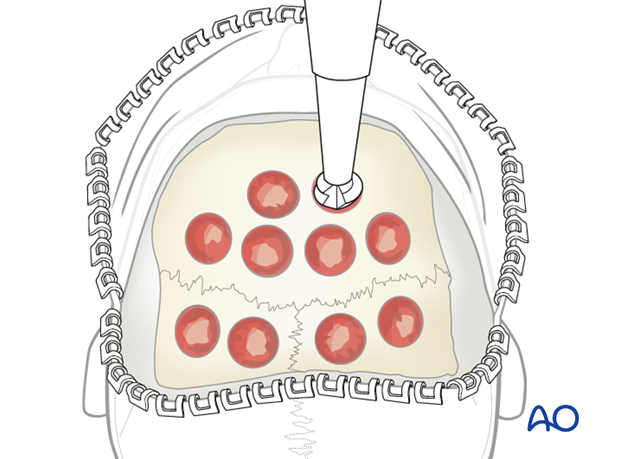
Bone paste or bone dust may be harvested with a hand-powered instrument or a large neurosurgical perforator at very low speed passing through the outer table into the diploë.
Additional cancellous bone can be harvested from the diploic layer using bone curettes or bone splitters.
13. Closure
Resuspension of the facial envelope
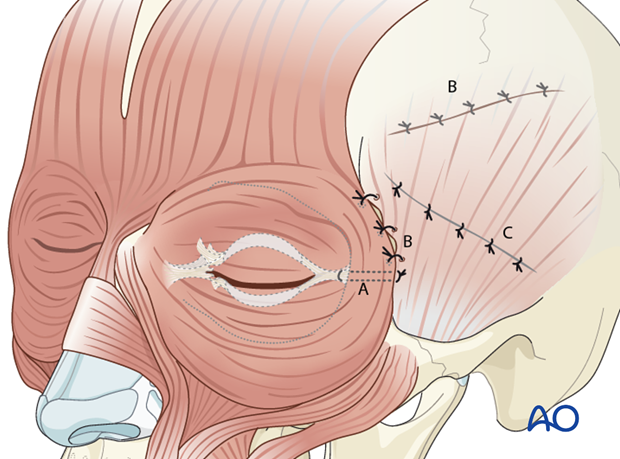
To prevent ptotic soft-tissue deformities resulting from degloving, several resuspension measures are recommended to restore the facial ligaments and septae prior to skin closure. The resuspension resembles a subperiosteal face lift procedure and is done in the following order (according to what is individually applicable):
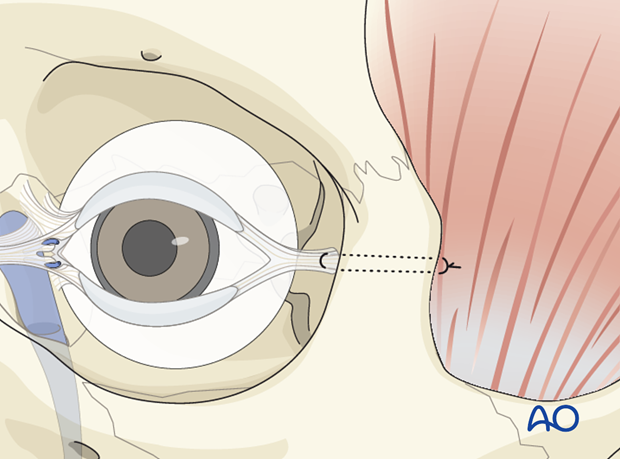
- Lateral canthopexy (A)
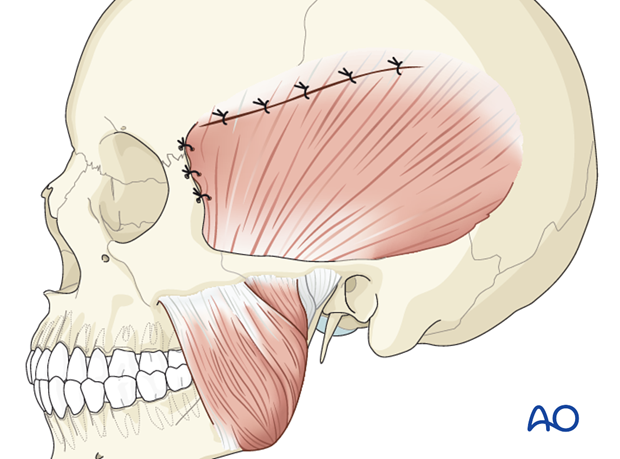
- Refixation of the temporal muscle (B)
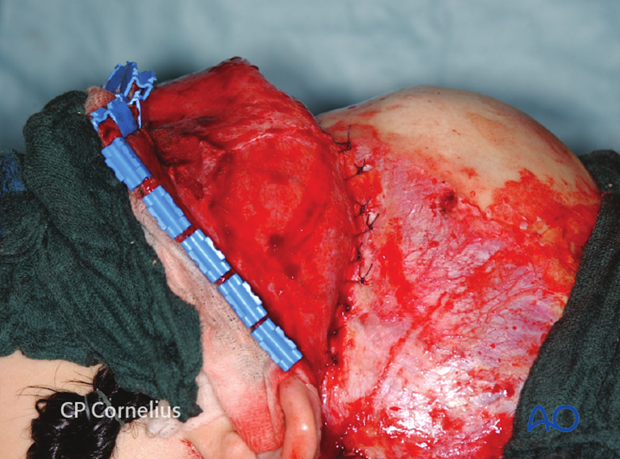
- Refixation of the superficial layer of the temporalis fascia (C)
Lateral canthopexy
If the lateral canthal attachments to Whitnall’s tubercle have been detached, re-anchoring to the bone is advisable.
The lateral canthus should be reattached inside the orbit and not to the rim. A secure reattachment of the canthal tendon to the bone can be achieved by drilling a hole through the lateral orbital rim.
The lateral canthus in Caucasians is usually slightly higher than the medial canthus.
The vertical and sagittal positioning of the drill hole inside the orbital wall is determined by identification of Whitnall’s tubercle.
The drill hole can be enlarged in an upward or downward direction for final adjustments.
A double armed suture is passed through the lateral canthal tendon and passed through the hole in the lateral orbital wall. It is then passed through the temporalis fascia and secured.
Refixation of the temporalis muscle
Whenever the temporalis muscle has been elevated from the temporal surface of the orbit, it should also be re-sutured to the soft-tissue cuff left along the superior temporal line.
Moreover, suspension of the anterior muscle to the temporal edge of the lateral orbital rim is performed by passing sutures through drill holes.
Refixation of the superficial layer of the temporalis fascia
The inferior edge of the incised superficial layer of the temporalis fascia is resuspended superiorly to the temporalis fascia with a slow absorbing running suture. An attempt is made to oversuspend the fascia to elevate the detached periosteum into its proper position on the skeleton.
Skin closure
The use of a suction drain is recommended. Flat drains are brought out through the scalp posterior to the coronal incision.
Finally the scalp is folded back and properly aligned into the original position.
The wet gauze and the hemostatic clips are removed stepwise and hemostasis is achieved. The scalp is then closed in two layers along the exposed wound edges.
For the galea/subcutaneous layer slow resorbing 2-0 sutures are used. The skin incision is closed with permanent skin sutures or surgical staples. Staples are preferred if the hair was not shaved.
The preauricular extension of the coronal incision is closed in layers.
Hair and skin are copiously rinsed to remove residual blood clots.
A compressive head dressing may be placed to prevent hematoma formation underneath the coronal flap. It should not be too tight, as periorbital edema will intensify with the scalp under tight pressure.
The scalp skin sutures/staples are removed 10 days postoperatively. Preauricular skin sutures are removed after 6 days.
